Map
Zoom Levels, Panning and other Map features
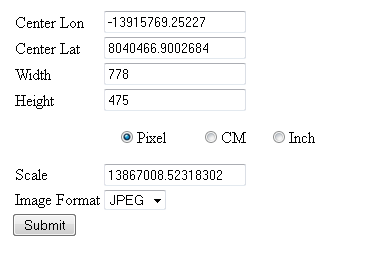
The map viewer is a useful tool as it allows the user to spatially view assets as well as extract base data (i.e. name, description, material, etc). In map view you can adjust the zoom level (scale), pan through the map, and change what data is visible. To access (or close) any of the tools, click on the corresponding tab.
There are two options to choose from in order to zoom in or out of the map. The first is by using the controls that appear as tabs above the map. Simply click on the control you would like to access. The ‘zoom in’ tab zooms into the map at incremental scales, while the ‘zoom out’ tab zooms out of the map at incremental scales. The ‘extent’ tab zooms of the full extents of the layers that you have displayed on the map.
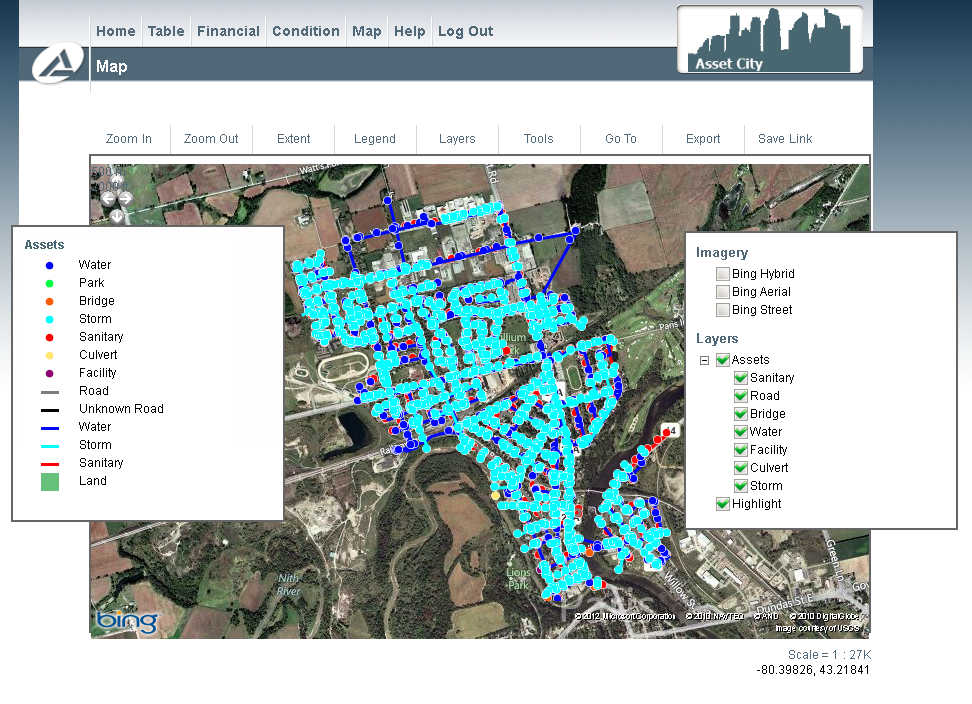
The ‘tools’ tab opens (and closes) a dialog box that has measurement and scale controls. To measure a distance on the map, click on the ‘measure’ button. This will change the cursor from an arrow to a box. Locate the start point of the distance to measure with the cursor, single click on the map, move the cursor to the end point of the distance to measure and double click to stop measuring. In order to measure a distance of irregular shape (i.e. something that would not be a straight line measurement), single click to change direction. To measure another distance, you can either click on the next start point of the measurement and repeat the above instruction, or click on the ‘reset’ button to clear the current measurement. To measure the area of an object, click on the ‘measure area’ button and repeat the above steps.
The scale controls located in the ‘tools’ dialog box changes the scale of the map according to predetermined scales, or to a specific scale entered by the user. The default option is to choose a scale from the corresponding drop down menu. In order to manually enter a scale, double click on the drop down menu. The current scale of the map is located in the bottom right hand corner and will change to reflect the new scale of the map each time a new one is chosen. The wheel of a mouse will also zoom in and out of the map. To zoom in roll the mouse wheel forward, to zoom out roll the mouse wheel backwards. Finally to make a zoom box, hold the shift button, click the map and drag. This will make a box, and the map will be zoomed to the area that is enclosed in the box.
The coordinates for the cursor are located in the bottom right corner. The coordinates let you know the geographic location of your cursor. If you were to put your cursor over one of the points on the map, you would know the location of that point.
Alternatively, it is possible to zoom in and out of the map using the controls that are in the map window.

Pan controls are also integrated into the map window. To pan around the map, click on the arrow in the direction that you would like to pan. Alternatively, you can click and drag the map window to the location (on the map) that you would like to view.

The ‘address’ tool allows you to locate and zoom into specific places. Simply type the address into the text box. This can be anything from a province, a city or a street address. Note: there may be addresses that cannot be located. The address tool searches the database that the Bing imagery is created from.
The options button located at the top left hand corner of the map window allows the user to change the resolution of the site to suit a particular monitor.
The Go To options allows you to go to a certain location on the highway. There is an option for KM location and for an address if available.
Layers and Legend
The ‘layers’ and ‘legend’ tabs can be used to display or hide the layers and legend panes. To turn on and off specific layers within the map, click on the check box located beside the layer name in the layers pane located to the right of the map. These boxes can be moved around the screen by simply clicking and dragging. The legend will adjust to the layers that are visible.
Export
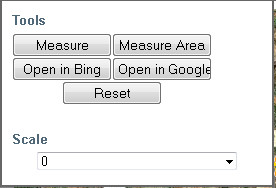
The print/export option allows you to print or export the current map. The export feature will navigate you to a separate page where you can define parameters such as width, height and scale that you want your image exported to.
Clicking on submit will generate an image that you can copy and paste into a report, email or any other application that can handle images.
Lastly the save link option allows you to copy and/or bookmark the current map selection so you can open it again in the future.